Working with HTML and CSS to create the resume frontend

It will be easiest to begin this process after you’ve got your HTML resume working locally and know that your CSS looks how you want it to. The goal of this project isn’t to become an expert frontend developer, so don’t feel bad if you modify a template you found online that uses fancy bootstrapper (like I did). We care more about working with Azure tools and understanding the configuration.
I found a template by CeeVee for an online Resume, downloaded the html and css files and opened them in Visual Studio Code. I made changes to the icons, removed some of the social links, and added a Blog option in the navigation panel. The purpose of this challenge is to become exposed to a variety of services within Azure – both frontend and backend. I think it’s best to have just a basic understanding of HTML for this challenge, and how it can be formatted with CSS. I used a few tutorials and interacted with ChatGPT to format things how I wanted to. I would quickly test them by launching the index.html file locally.
Before I got to this step of the Cloud Resume Challenge, I did not fully understand how a website or a domain works. And I still don’t. Things like www being it’s own subdomain, how exactly CNAME records work, and the intricacies of SSL certs and HTTPS. But I really enjoyed this part of the project since I was able to get really hands on with Azure and could see the results in real time. I hit a variety of hurdles along the way (mostly with DNS propagation time and using HTTPS with a root domain), but it was an immense learning opportunity.
I really wanted my site to load when a user types the root domain techbrett.net . It was a fairly straightforward to get https://www.techbrett.net working and a really easy to get www.techbrett.net working. But the root domain proved to be quite the challenge in itself.
Root domains and CNAME Flattening
Most DNS providers don’t allow a CNAME or A record to point at the root or apex domain (for example techbrett.net). If you want your site to be accessible by just typing mydomain.com then I recommend using Cloudflare. You can also use Azure DNS, but the interface is somewhat difficult to work with (really just sluggish). I’m not going to go into all of the details, but do a quick Google search on CNAME flattening and you can get an idea of what I’m talking about. Anyway – onto the tutorial!
Creating a storage account
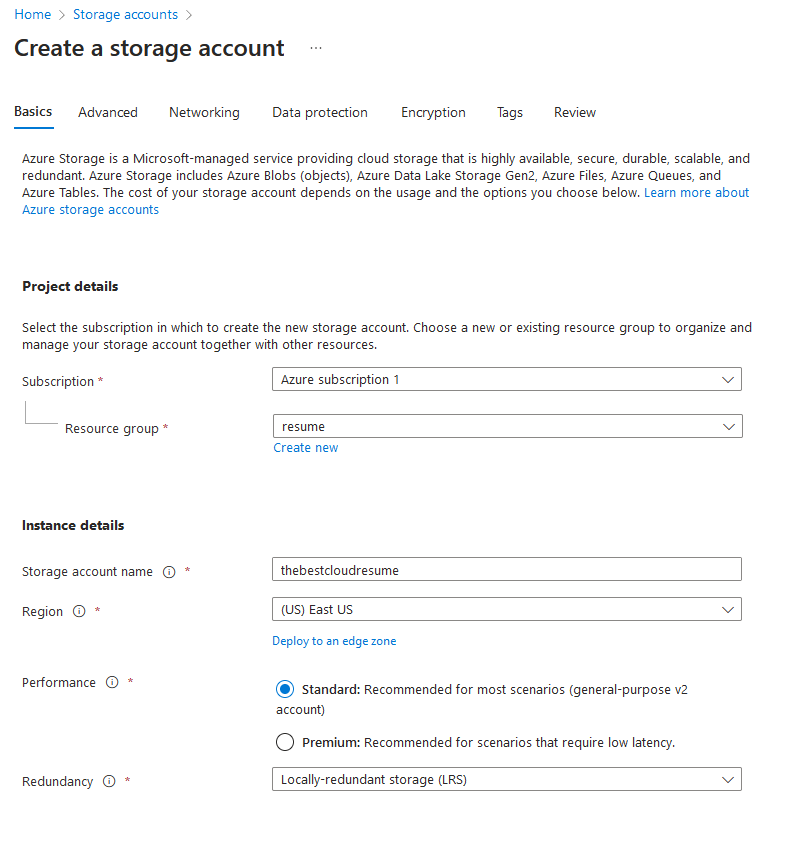
I’m going to assume you’ve already created an Azure account and are logged into the dashboard. From there navigate to Storage accounts and create a new one, creating a new resource group for this project and giving it a unique account name. Region should auto select and select Standard performance and LRS redundancy is fine for the scope of this project.
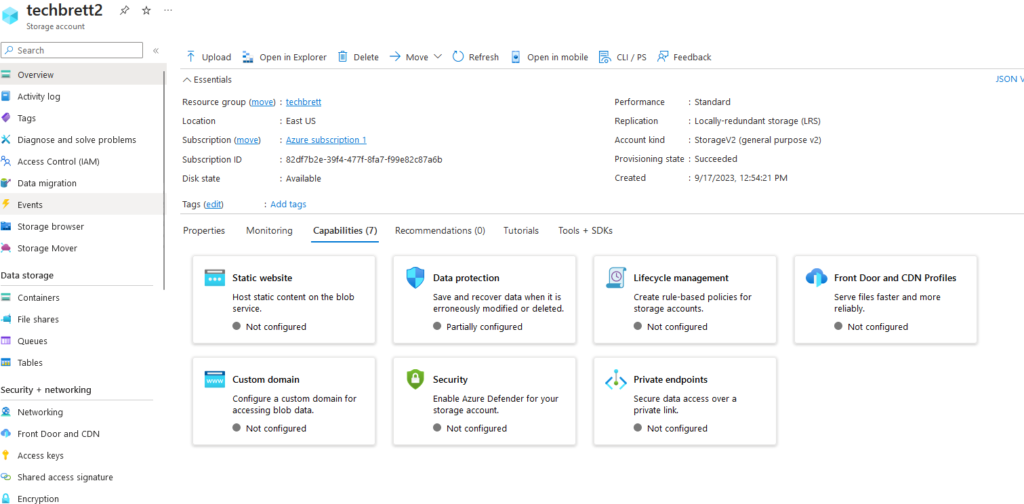
Once the resource is ready you’ll find yourself at the dashboard, which can be quite overwhelming at first. When working in a huge environment like Azure, you must always keep the scope of the project at the front of your mind! Click on the Capabilities tab and take note of all that our storage account can do:
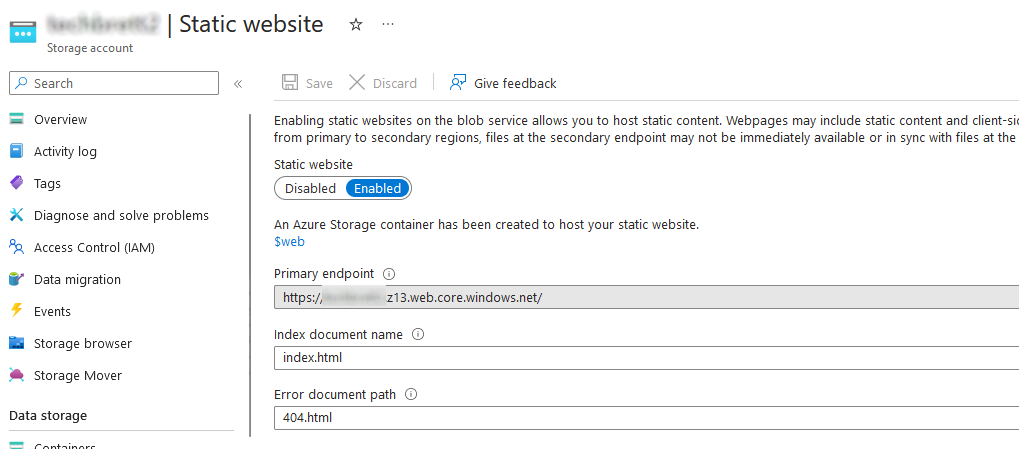
Enabling Static Website
We’ll start off by clicking Static website and clicking Enabled. Input index.html for the Index document name, and it’s up to you if you want to add a 404.html for the Error document path.
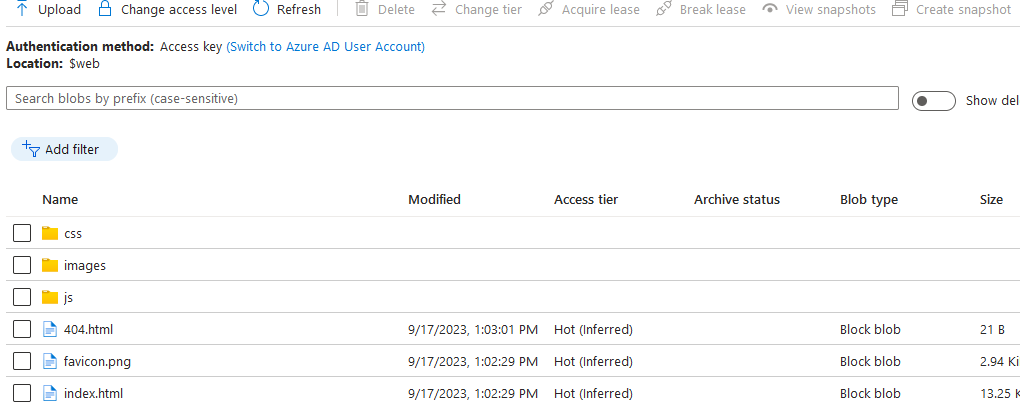
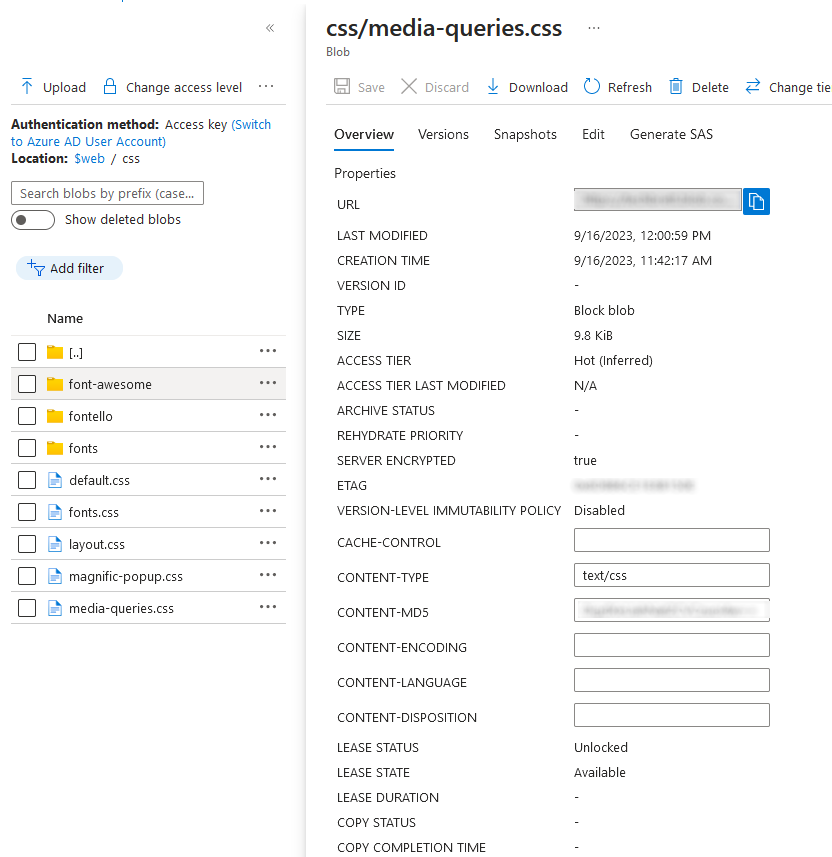
Enabling the static website will also create a $web folder in Containers. Navigate to it and upload all the files for your website. You should now see them all sitting there nicely:
Before leaving this section, double check the Content Type of the html and css files. I had to manually enter text/css for each css file as each one was originally set to application/octet-stream and my stylesheets wouldn’t load.
Enable custom domain
Now that we’ve got our files in a storage container, we need to make them easily accessible via a custom domain. You can view the static website endpoint by clicking on Settings – Endpoints. You’ll see the static website URL which will display your page. But that’s not easy to remember and I’m sure you’ve got a cool custom domain you want to use. Click on Networking under Security + Networking, and then the Custom domain tab towards the right.
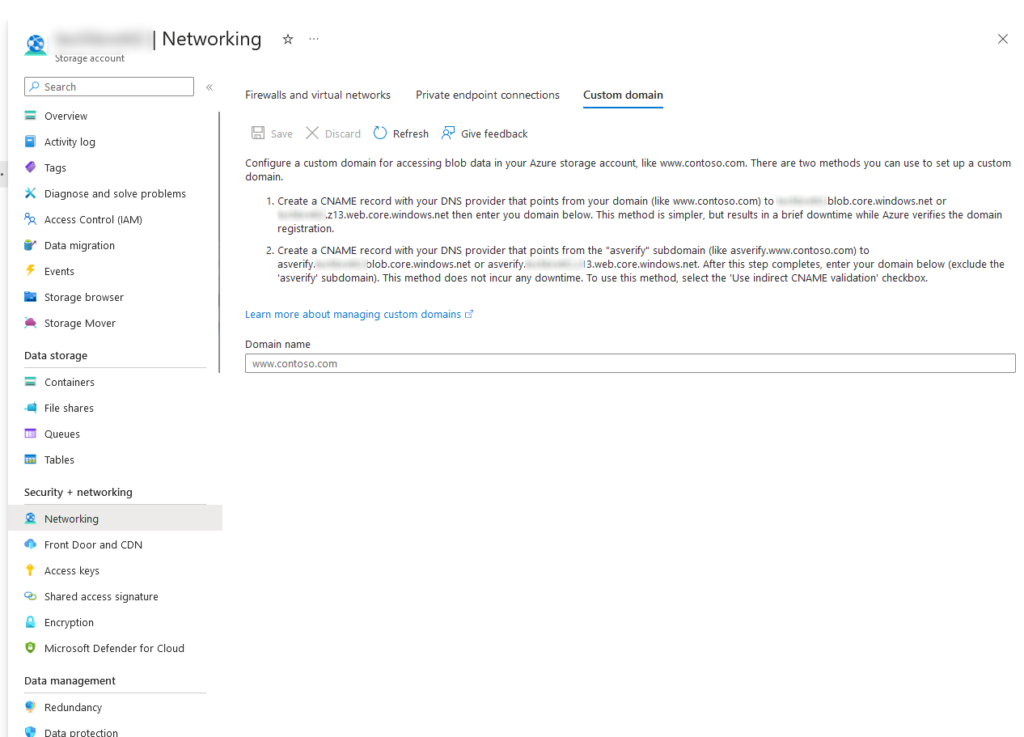
Notice the instructions here – you will need to create a CNAME record with your domain pointing to the static website. Double check the values listed on your page and copy/paste them. I had the best luck using the asverify subdomain as it doesn’t require any downtime to verify. My CNAME record looks like this:
Host: asverify.www
TTL: 3600
Record type: CNAME
Value: asverify.storagename.z13.web.core.windows.net
Then input your domain (with the www. subdomain) and check Use indirect CNAME validiation checkbox if you used the asverify method to avoid downtime.
Keep in mind that any changes to your DNS records will take time, but usually update within an hour. I kept my TTL low (60 seconds) for this whole project since I wasn’t exactly sure what I was doing and didn’t want to wait hours in between each change. Try accessing your site at www.yourdomain.com and see if it loads. Making progress!
Setup CDN Endpoint for HTTPS
So far, so good! We’ve got a storage account setup with our files uploaded, and we can access our site using our custom domain name with http and the www subdomain. But part of the Cloud Resume Challenge is configuring a CDN within Azure and enabling HTTPS. This is where I ran into a lot of trouble, because my understanding of DNS records, subdomains, and root domains was fairly weak. If you’re unsure of yourself like I was, I recommend watching a Youtube video that explains the different parts of a domain’s DNS records, like this one here: https://www.youtube.com/watch?v=HnUDtycXSNE
Keep in mind that you don’t need to use the registrar you purchased the domain from as your DNS records host. You can just point the nameservers to another service (like Azure DNS or Cloudflare) and edit DNS records there and take advantage of the extra features. This will come into play later when I get into getting the root domain to work. But for now, let’s get the CDN configured.

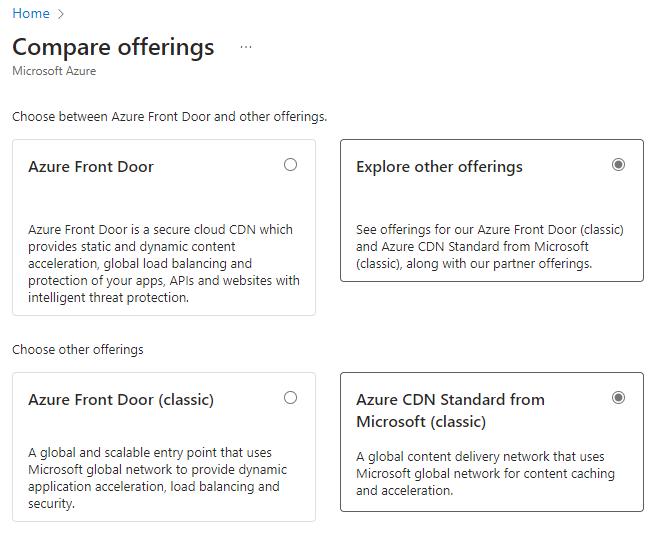
First thing is to navigate to Front Door and CDN profiles. Looking at other tutorials, it looks like Microsoft combined these into a single service. Click Create and select Explore other offerings and click Azure CDN Standard from Microsoft (classic). You can do a Front Door if you want more granular control over the routing, but it is more expensive – $35/month plus data fees. I’ll go into this later, but a CDN is much cheaper and with the correct configuration it will perform just the same.
Select the subscription you’d like to use, and either create a new resource group or use the one you’ve been using for this project. Keep in mind that the CDN profile and CDN Endpoint are two different things, but I gave them both the same name. Select Microsoft CDN (classic) for the pricing tier, and check Create a new CDN endpoint. Give the endpoint a name, and be sure to select Storage static website for the Origin type, and select your static website endpoint for Origin hostname (the one that ends with web.core.windows.net). You can select Ignore query strings for query string caching behavior. Click Review + create, then click Create.
Open the resource once it’s created, and then click on the newly created endpoint (ends with azureedge.net). You’ll see info about this endpoint, and you should be able to access the contents of the $web container (your html resume) by clicking on the HTTPS Endpoint hostname in the top right. Pretty neat!
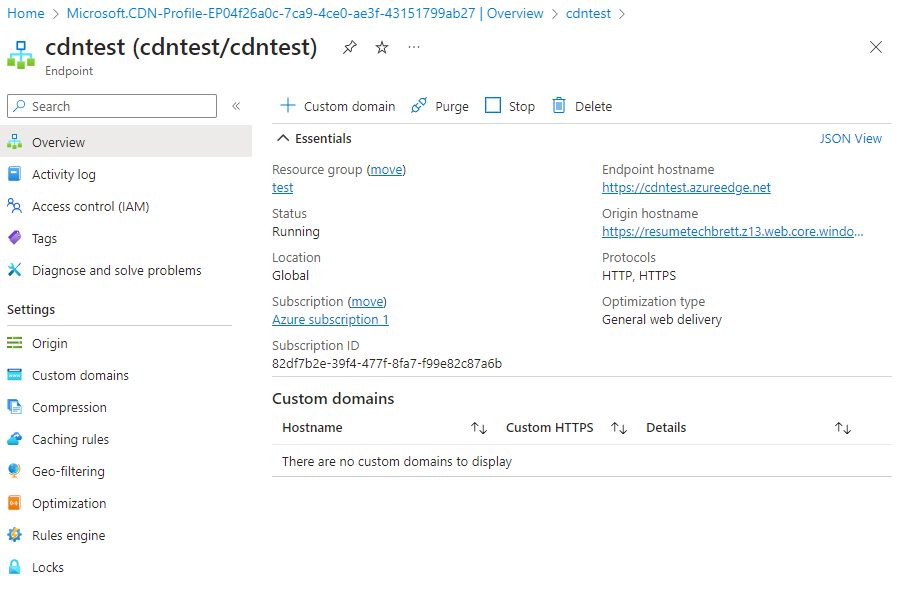
But we’re not done yet! We want a nice custom domain to point our potential future employers and colleagues to, so click on + Custom domain at the top. Now, this is where things got a little tricky for me. I learned the hard way how www is a subdomain and how www.mydomain.com is different than just using mydomain.com. Microsoft recommends adding cdnverify to your CNAME records to minimize downtime. Open up the DNS records for your domain and add 4 new CNAME records like this:

Host: cdnverify
TTL: 3600
Record type: CNAME
Value: cdnverify.cdnendpointname.azureedge.net
Host: cdnverify.www
TTL: 3600
Record type: CNAME
Value: cdnverify.cdnendpointname.azureedge.net
Host: www
TTL: 3600
Record type: CNAME
Value: cdnendpointname.azureedge.net
Host: @
TTL: 3600
Record type: CNAME
Value: cdnendpointname.azureedge.net
Give this some time and then go back to the custom domain panel of your CDN Endpoint. Input each custom domain and add then to your endpoint. You’ll see them show up with HTTPS as disabled. Don’t worry – that will come later.
Buying a PositiveSSL cert for your domain
Before configuring HTTPS, we’ll need an SSL cert so that we can use the root domain. Note: if you’re fine with using https://www.mydomain.com then this step is not necessary. You can use Azure managed CDN for HTTPS for subdomains (including www). That service does not cover root domains – those are only supported when you BYOC (bring your own cert). Normally, buying an SSL cert from DigiCert will cost hundreds of dollars ($289 at time of writing). I dont’ know all the details of SSL certs, that’s out of the scope of this project. I’m not that concerned – I just wanted to be able to provide a potential employer with my root domain and they easily be able to access it. Namecheap offers PositiveSSL certs for $11/year, or less if you buy more than 1 year at a time.
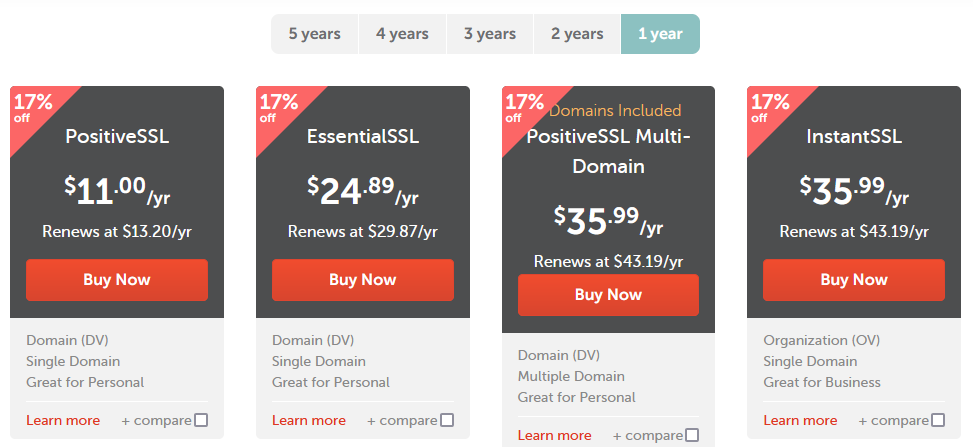
I found a great walk through online explaining more detail on this, and decided to include it here in case you’re reading this and want to know more: https://www.wrightfully.com/azure-static-website-custom-domain-https
Import SSL cert into Azure Key Vault
Once you’ve purchased the cert, it’ll say “In Progress” within your Namecheap account. We’ll verify it through Azure Key Vault. Create a new Key Vault and click Certificates. Click Generate/Import. Give it a name, select Certificate issued by a non-integrated CA, enter CN=mydomain.com and click DNS Names and enter in your domains. The PositiveSSL cert I purchased included the www subdomain so I added that in as well. Select PEM as the content type and click Create.
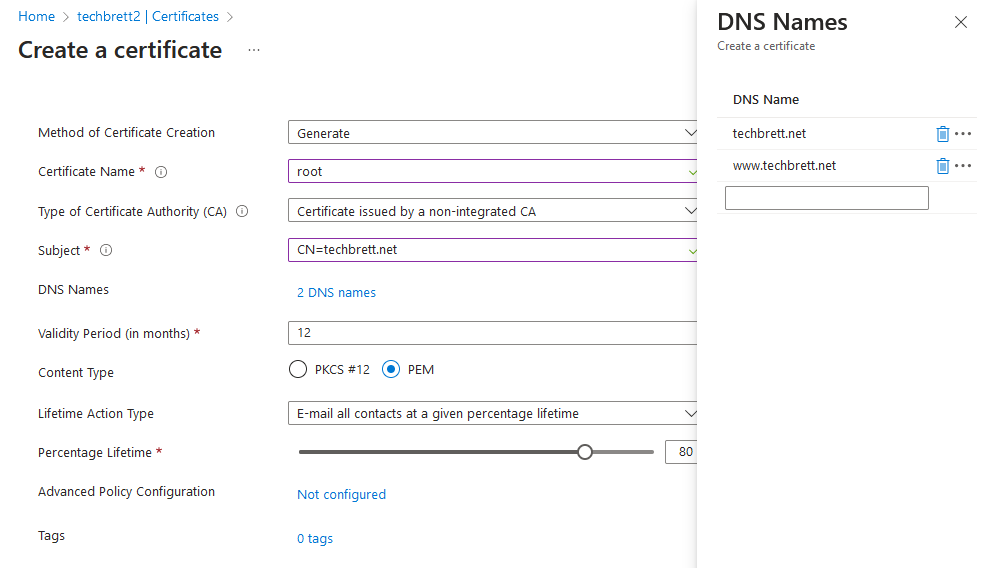
The cert will be created but disabled. On the next screen click Certificate Operation and then Download CSR.

Open the downloaded .csr file in a program like Notepad or Notepad++. It should look like this:

You’ll need to copy and paste that entire thing into Namecheap to verify the SSL cert. Namecheap will provide you a CNAME record to add to DNS to verify your domain and activate SSL. After adding the CNAME, go back into Namecheap and find the button Edit Methods – click the little error and click Get Record. Click Save Changes / Retry Alt DCV. This should verify your SSL Cert for your domain.
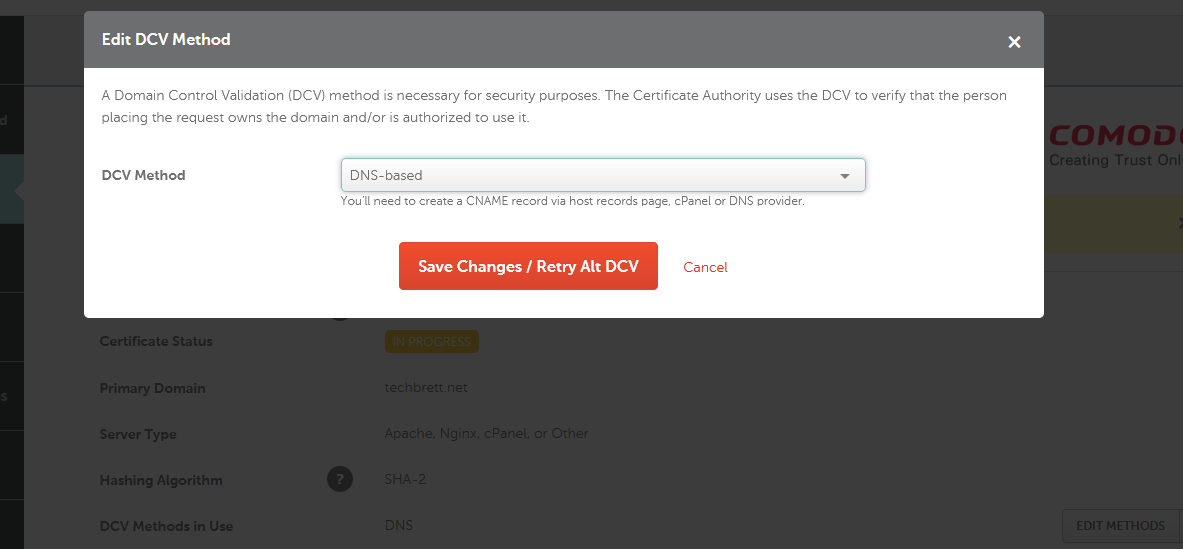
You’ll get an email afterwards with a zip file containing a .crt and a .ca-bundle file. For whatever reason, my cert didn’t include a .pem or .pfx file that included the private key. There’s probably an easier way to do this, but I just went back into the Certificate in the Key Vault, click Merge Signed Request under Certificate Operation. Congrats! Your cert has been added. You can try going onto the next step to enable HTTPS and pointing it to the cert in your key vault. Mine gave me all kinds of problems where Azure couldn’t parse my certificate, then it needed a .pfx file. So if you’re running into issues like that, read on.
Acquiring Cert Private Key
Once the certificate has been added in Azure and is enabled, click on it, click on the current version, and click Download in PFX/PEM format. Open that .pem file in Notepad, and copy and paste the everything from —–BEGIN PRIVATE KEY—– to —–END PRIVATE KEY—– and save it to the same folder as the .crt file you downloaded from the SSL email earlier as private.key. Now we need to create a .pfx file. This requires OpenSSL, but that can only be run on Ubuntu. If that’s the OS you’re running – great. If not, read on.
Creating .pfx file via openssl and Chocolatey
You will need Chocolatey installed on Windows in order to run this command. You can find the documentation here: https://chocolatey.org/install . This requires an administrative shell (like powershell). I’ll just copy and paste the instructions here.
With PowerShell, you must ensure Get-ExecutionPolicy is not Restricted. We suggest using Bypass to bypass the policy to get things installed or AllSigned for quite a bit more security.
Run Get-ExecutionPolicy. If it returns Restricted, then run Set-ExecutionPolicy AllSigned or Set-ExecutionPolicy Bypass -Scope Process.
Now run the following command:
Set-ExecutionPolicy Bypass -Scope Process -Force; [System.Net.ServicePointManager]::SecurityProtocol = [System.Net.ServicePointManager]::SecurityProtocol -bor 3072; iex ((New-Object System.Net.WebClient).DownloadString('https://community.chocolatey.org/install.ps1'))Paste the copied text into your shell and press Enter.
Wait a few seconds for the command to complete.
If you don’t see any errors, you are ready to use Chocolatey! Type choco or choco -? now, or see Getting Started for usage instructions.
Next we need to install OpenSSL with Choco, so run this command:
choco install openssl If you run into errors about dependencies you can run the following command to just force it along:
choco install openssl --ignore-dependenciesIt’ll be easiest if the .crt file, .ca-bundle file and the private.key file we created are in the same folder. Navigate to the folder containing both files and run the following command:
openssl pkcs12 -export -out server.pfx -inkey private.key -in your_certificate.crt -certfile ca-bundle.crtDO NOT give the .pfx file a password – Azure won’t like that. This will output a file named server.pfx which is exactly what we need!
Import .pfx file as certificate in Key Vault
Go back into the Azure Key Vault, click Certificates, click Generate/Import, only this time select Import and point it to the sever.pfx file we created.
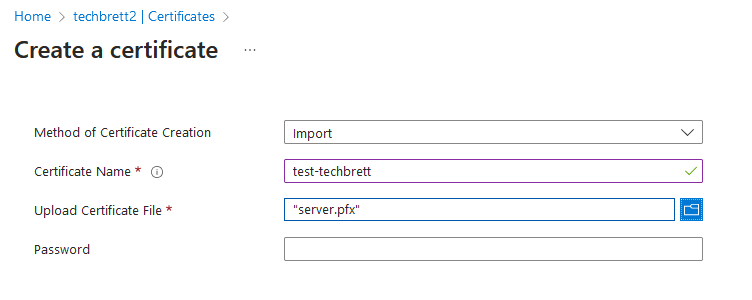
This should automatically import and enable the certificate within your Key Vault. Remember the name of the cert and the key vault as we’ll need this in the next step.
Enabling HTTPS on your Azure CDN
Alright, we’re on the home stretch! Open up the Front Door and CDN profiles within Azure, click the endpoint we created, and click on one of the custom domains we’ve add. As long as your PositiveSSL cert included both the root and the subdomain www, and if you’ve set everything up correctly, you should be able to use that imported certificate in the Key Vault. Click On for Custom domain HTTPS and select Use my own certificate. Go through the settings to select your Key Vault, Certificate/Secret, and then Latest for the last field. It’ll pretty much look like this:
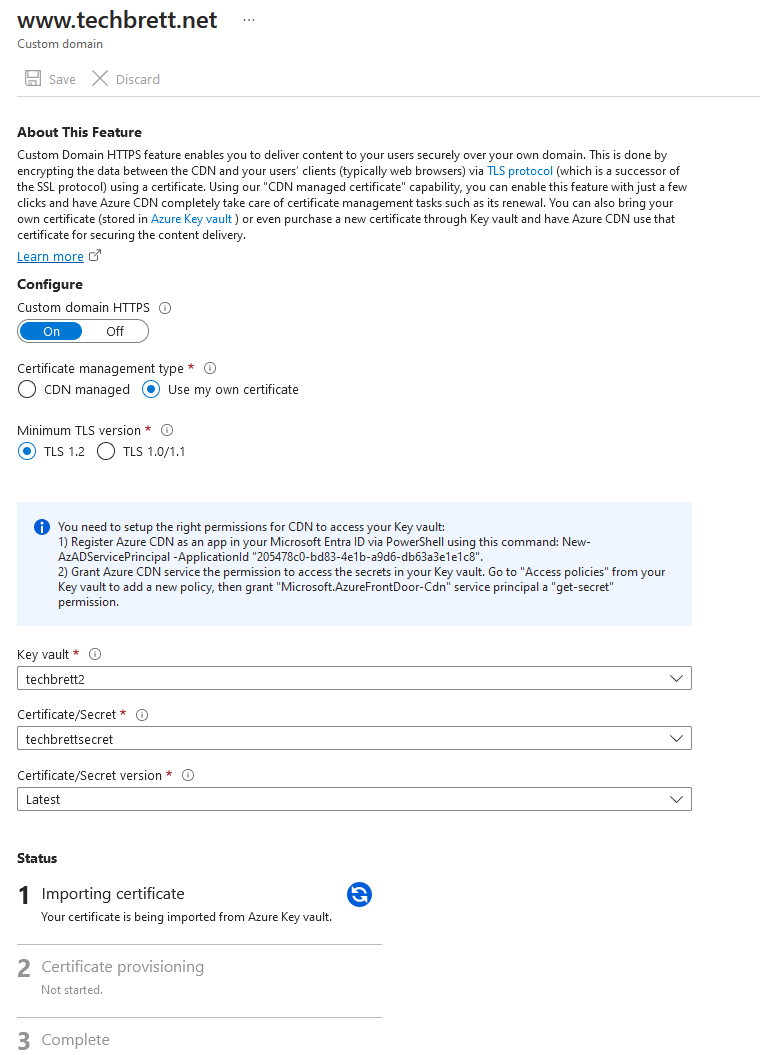
This will not go through until the steps listed in the blue info box and to setup the correct permissions. Follow those 2 steps exactly. I’ll list the steps out here as well:
Open a PowerShell prompt and run the following:
This will install the Azure AD CLI (Command Line Interface) for PowerShell, which is needed for the next two commands:
Install-Module AzureADAuthenticate with Azure:
Connect-AzAccountGive the Azure CDN service account an AD Principal in your default Azure AD instance: Note: The GUID in this command is the same for everyone — no need to change it.
New-AzADServicePrincipal -ApplicationId "205478c0-bd83-4e1b-a9d6-db63a3e1e1c8" -VerboseNow, back in the Azure portal, in the Key Vault, select the “Access Policy” pane and click “+ Add Access Policy”. Keep in mind you may need to disable RBAC and enable Vault Access Policy in order to grant the newly created service principal the correct permissions.
Click Create, and select Get and List for both Secret Permissions and Certificate Permissions, like so:
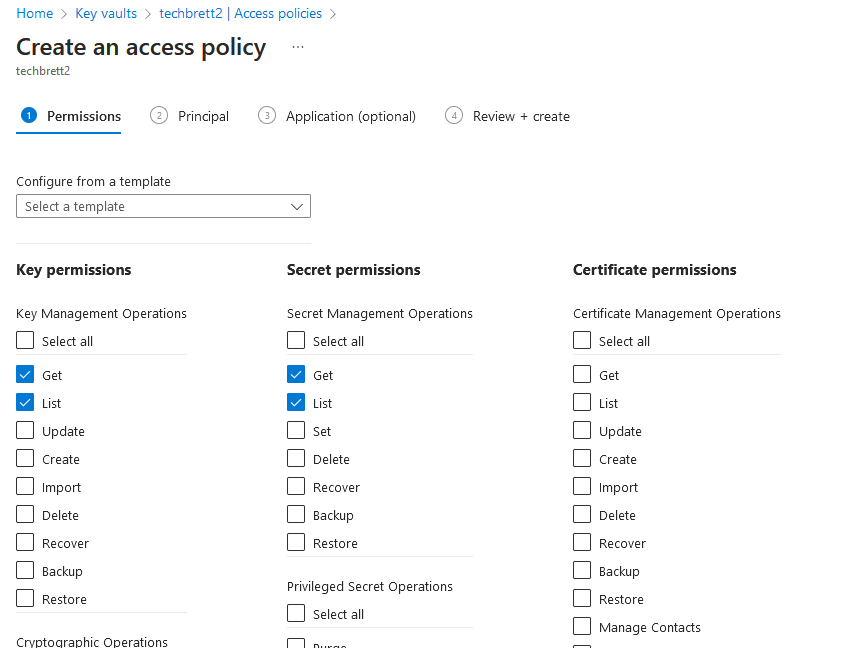
Also note that the service principal is now named Microsoft.AzureFrontDoor-Cdn – Microsoft always changing things on us!

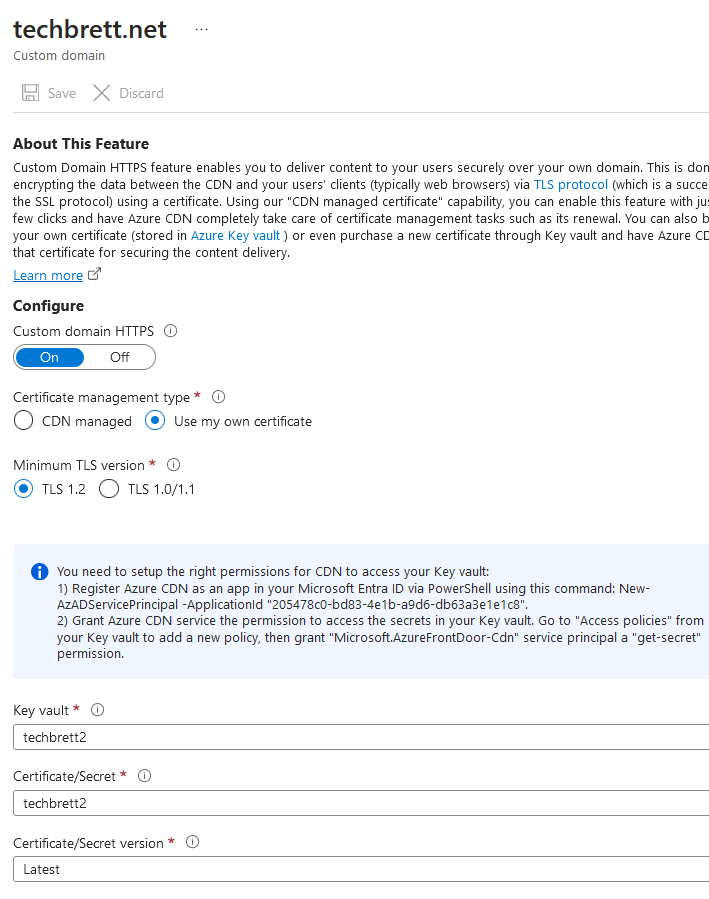
Nowwww you should be able to go back in and complete the HTTPS enabling process with your own cert. Here’s a screenshot of my root domain after it was added to the CDN endpoint:
It may take a few hours, but eventually you’ll get 3 green checkmarks at the bottom:

Give DNS some time to propagate, and you should be able to access your domain by using the root only!
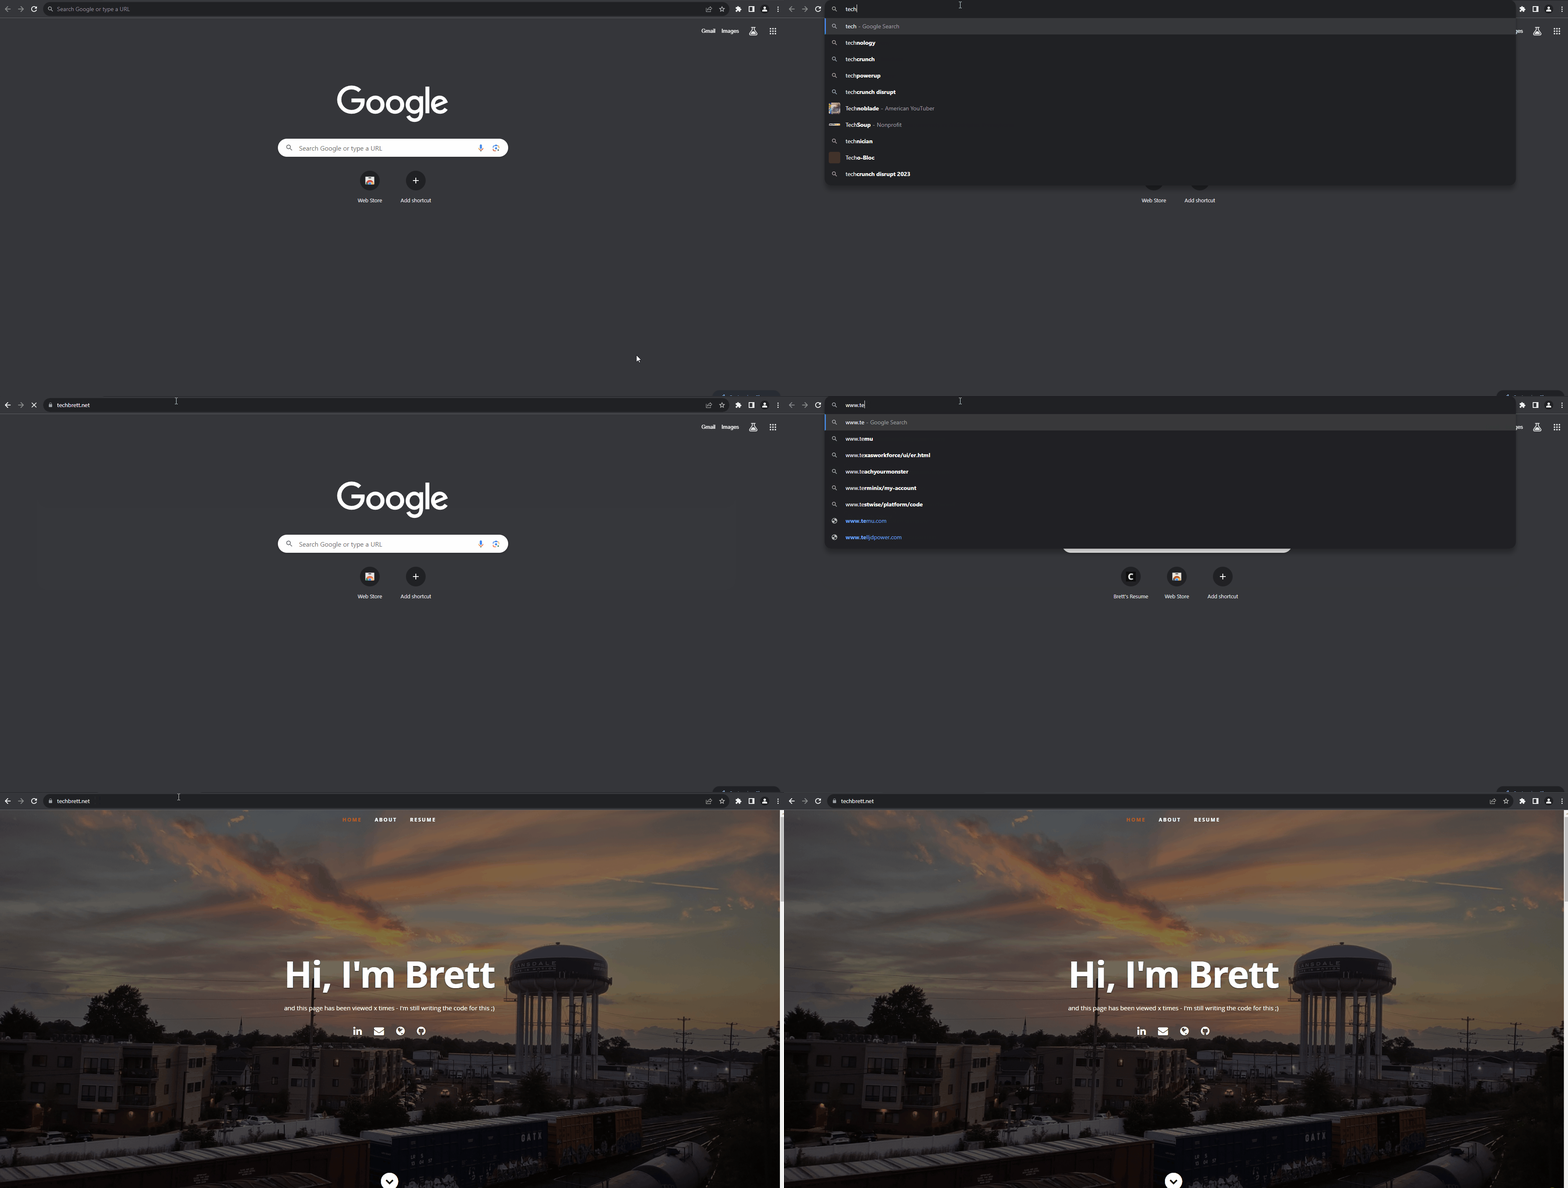
I can’t figure out how to make the gif larger, so just right click and open the image in a new tab – using the root domain techbrett.net is now working with the help of our own SSL cert, Azure Key Vault, and CNAME flattening via Cloudflare!
Setting up CI/CD with Github Actions
Hopefully you’ve taken a break since finishing the frontend setup. We’ve successfully setup a static website in Azure, configured a CDN, and enabled HTTPS with our resume in HTML. That in itself is a huge achievement! I felt out of my element for most of it, but I really enjoyed getting my hands dirty navigating Azure.
But there’s more to the challenge – we still need to setup a backend. This part of the challenge will use an API to interact with a CosmosDB and display a visitor counter on the site. I used Visual Studio Code for this part of the challenge since it has a variety of extensions that work well with Azure. One of them is GitHub Actions which can be setup to automatically update our storage container each time we push changes to our repo. This is a much better method than manually uploading files to Azure, since GitHub has version control and integrates into Visual Studio Code.
GitHub account and Visual Studio Code
Getting all of this setup is pretty straightforward if you follow Microsoft’s Documentation, but I did run into an issue with authentication which I’ll go into in detail below. First thing to do is sign up for an account at GitHub:
You’ll also need to create a new repo within GitHub. This is where our files will be stored, where we’ll push updates to, and where we can include documentation.
Once you’ve got your GitHub account, GitHub repo, and Visual Studio code setup install the following VS Code extensions:
- Azure
- Azure Tools
- GitHub Actions
- Azure Resources
Sign into your Azure and GitHub account within VS Code. The first thing you’ll want to do is clone your GitHub repo (even tho it’s empty) to a folder on your local machine. To do this, create a new folder (I created “azure-resume” in my Documents folder” and then open a new project in VS Code explorer:
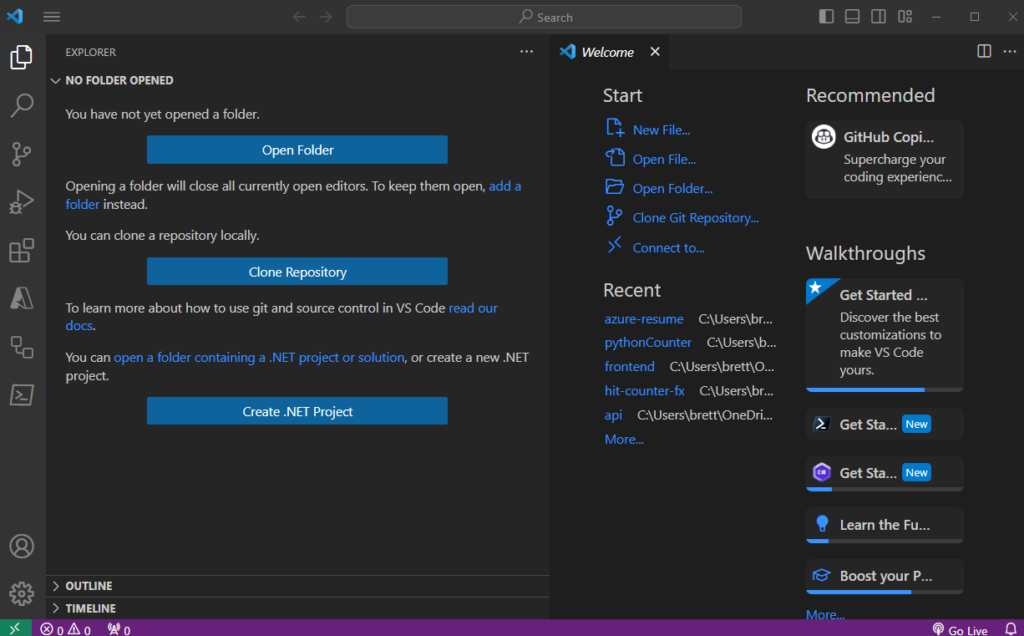
Click Clone Repository – Clone from GitHub – select your profile and repo (techbrett/azure-resume) and then select the folder you’d like to clone to. You can also do this by opening a terminal in VS Code, navigating to the local folder you want to clone to, and running:
git clone [YOUR REPO URL] Your VS Code should now look like this, with a blank README.md file:

Create Azure Service Principal
Great! We’re ready to begin. Click the navigation button in the top left – Terminal – New Terminal. Run the az command in the terminal to verify you’re connect to your Azure account:

For the next command we will need the subscription-id, so run the following command: az account list and locate the subscription you've been working with for this project:
Then enter the following command to create a service principal:
az ad sp create-for-rbac --name "myML" --role contributor --scopes /subscriptions/<subscription-id>/resourceGroups/<group-name>Where –name can be GitHub or however you’d like to name the app, <subscription-id> will be from the command we ran previously, and <group-name> can either be the existing group you used for the static website resources, or you can create a new one prior to running this command. The command should complete without any errors:

You will need this output in the next step, so copy and paste the entire thing in between the brackets. From there just follow the Microsoft documentation.
Configure GitHub Secrets
We need to securely store our Azure credentials within GitHub, so that when the workflow runs it can automatically make changes to our Azure storage account.
Access your GitHub profile and repo, click Settings and then Security – Secrets and Variables – Actions.

Click New repository secret. Now, copy and paste the entire JSON output from the command (az account list) we ran earlier and paste it in the empty field.

Save the secret as AZURE_CREDENTIALS. Click Add secret.
Create Workflow
Now comes the actual meat and potatoes of this part of the project. Following Microsoft’s documentation I expected this to be straightforward – and it mostly was. I ran into an issue with authentication though.
Go to Actions within your GitHub repository.

Select New workflow and then Set up your workflow yourself. Stick to the Microsoft documentation, but mine did not work with –auth-mode key Instead I had to use –auth-mode login and it worked! Here’s how my code looked:
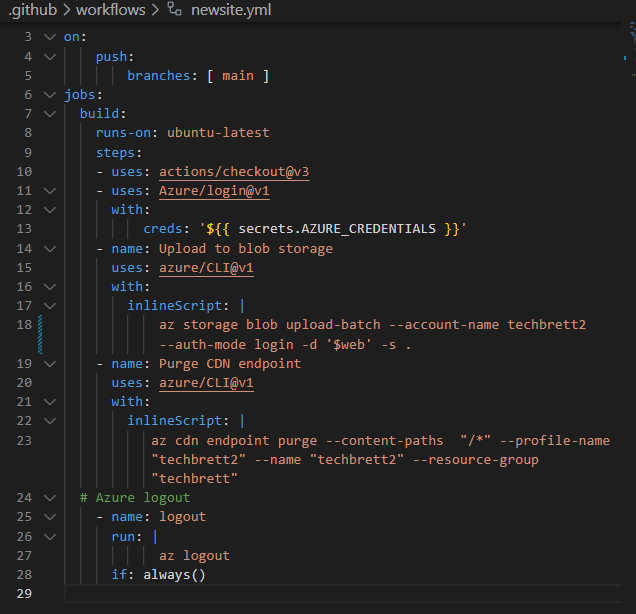
And here’s the code written out, obviously replace –account-name, –profile-name, –name, –resource-group, with the storage account name, CDN profile name, CDN endpoint name, and resource group that you’d like to update.
name: update site

on:
    push:
        branches: [ main ]
jobs:
  build:
    runs-on: ubuntu-latest
    steps:
    - uses: actions/checkout@v3
    - uses: Azure/login@v1
      with:
          creds: '${{ secrets.AZURE_CREDENTIALS }}'
    - name: Upload to blob storage
      uses: azure/CLI@v1
      with:
        inlineScript: |
            az storage blob upload-batch --account-name techbrett2 --auth-mode login -d '$web' -s .
    - name: Purge CDN endpoint
      uses: azure/CLI@v1
      with:
        inlineScript: |
           az cdn endpoint purge --content-paths  "/*" --profile-name "techbrett2" --name "techbrett2" --resource-group "techbrett"
  # Azure logout
    - name: logout
      run: |
            az logout
      if: always()
This workflow logs into the Azure account using the AZURE_CREDENTIALS secret we saved earlier. Then it uploads all changes to our local repo to the Azure storage account specified. Finally, it purges the CDN so that when a user views the page they’re viewing the latest changes. Finally, it logs out.
If the workflow completes without any errors, that means it was successful. It will look like this:

So going forward, any local changes made to the repo will automatically update the Azure Storage account when running the following commands within a terminal window in VS Code:
git add .
git commit -m "Enter commit message"
git push
Sometimes there will be an incosistency with the files and you’ll need to run:
git pull
git push
And that wraps up the CI/CD portion of the Azure Resume Challenge!

Leave a Reply